Chocolate and Tea Infused Date Loaf

1.1

There are few recipes with which you can play around,put your own stamp, tweak a bit here and there with the ingredients and so on; whereas there are few recipes,where you prefer to go  by the original taste and let it remain as pristine as possible ! This recipe qualifies into the second category for me.The recipe belongs to my friend Dwaipayan Dhar Chowdhury blogging at Food4thought .Dwaipayan is  one of the most passionate foodie I have ever met.We can chat hours on discussing about his and mine(actually more of his than mine ) latest acquisitions of cake tins and ramekins,recipes,cookery

2

books,experiments with unusual cooking ingredients and even some recipe’s socio-cultural history . He is a  passionate foodie ,a great cook and a mind blowing baker who apart from giving me a lot of important tips on baking ,taught me to replace butter with oil and have light ,moist and super soft cakes.If that’s not all I got the inspiration to blog from him.Wish he himself starts blogging more often.But then geniuses are like that,bit careless about themselves ,ain’t they?

3

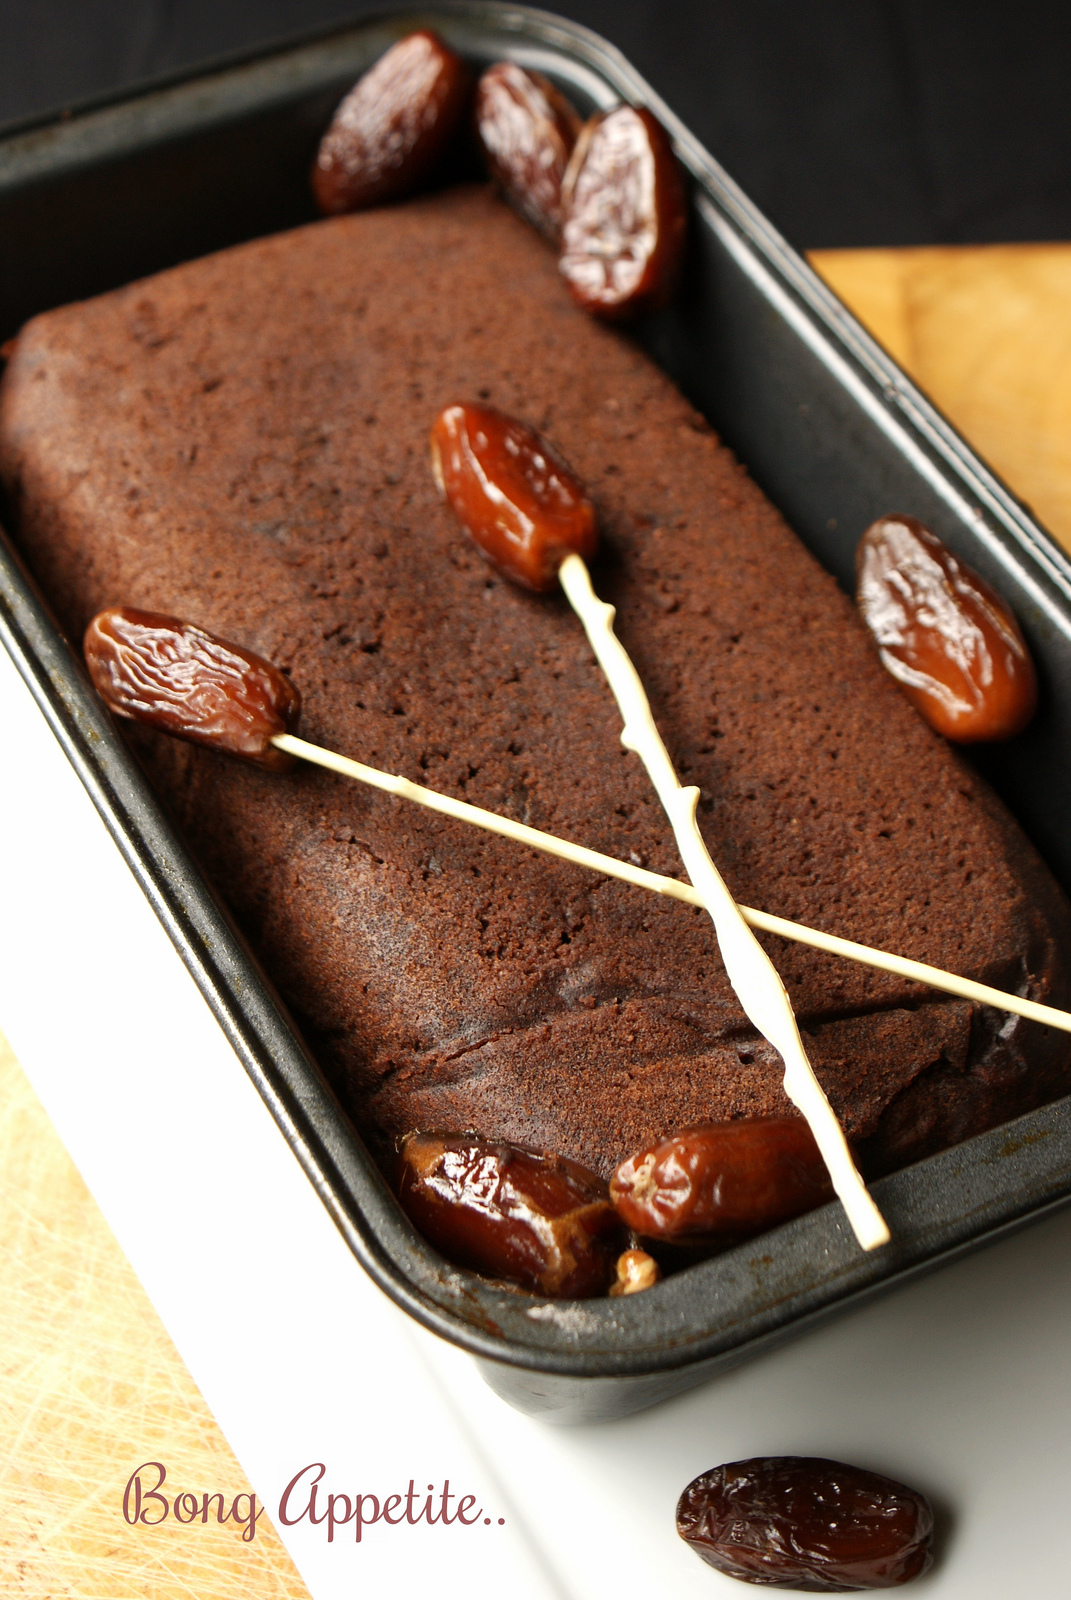
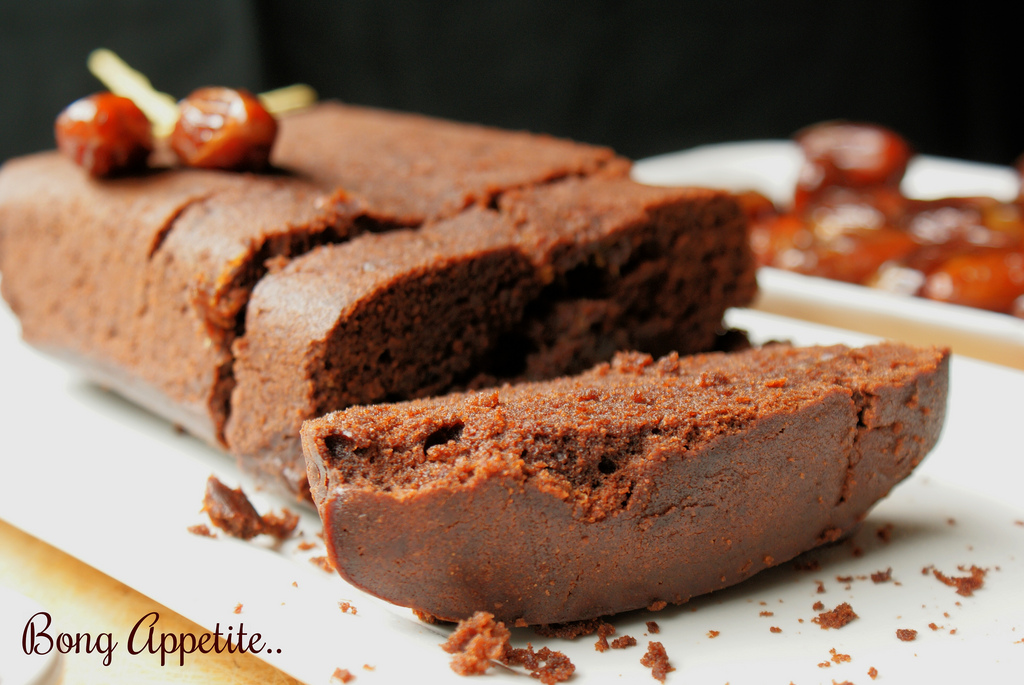
This chocolate and tea infused date loaf spiked by the heavenly aroma of nutmeg and cinnamon is a tea lover’s delight.The dates make the loaf sweet at right places.This loaf is a cross between bread and cake.It’s not overtly sweet and remains moist for two-three days at a stretch if kept in air tight box.Before I leap into the recipe,got to say whenever I have made this loaf ,whoever have ate this ,asked me ‘what have you put in the cake..ummm it’s so good?’ Well ,there’s no secret ingredient.Trust me.Whenever I pass on this feedback to Dwaipayan about his recipe ,he says ”Its’s my recipe after all,got to be good ;)” ! Well whatever that means,I bow down to this magic baker friend of mine ,who taught me to be confident about baking.Much thanks to him 🙂


4

Ingredients

  • All purpose flour/self raising flour  : 3/4 cup
  • Cocoa powder :1/4 cup
  • Baking powder :1 tablespoon
  • Salt,a pinch
  • Cinnamon powder :1/2 teaspoon
  • Nutmeg powder: 1/2 teaspoon
  • Vanilla essence :1 tablespoon
  • Granulated sugar :1/2 cup
  • Black tea :1 cup
  • Eggs : 2
  • White oil :1 cup
  • Dates : Deseeded and chopped ,1/2 cup


5

Recipe:

  • Preheat your oven at 180 degrees
  • Sift the flour,cocoa powder,baking powder,salt,cinnamon powder and nutmeg powder together.
  • Beat the eggs with sugar and oil .Keep the egg mixture aside.
  • Put the chopped dates in black tea and boil this for 2 minutes.Do not let the dates to get mashy at this stage.Leave it to cool at room temperature.
  • Now fold in the flour mixture with the egg mixture slowly with the help of wooden spoon.
  • Add dates with tea in the egg and flour mixture and fold in slowly.
  • Add vanilla in the cake batter.
  • Grease and flour a loaf tin and  put the batter in that.
  • Transfer the batter into the tin.Put the tin in the all ready preheated oven and bake the cake for 45-50 minutes or toothpick inserted in the middle of the loaf comes out clean.
  • Take the loaf off the tin and keep it on a wired rack to cool down.
  • Serve it with tea or coffee.
  • Enjoy !

How To Roast Whole Chicken

cr2


If you are part of the Bong Appetite family you know it by now, I am on an undeclared hibernation mode. Life in general keeping me little busy and bit pre occupied  with few other things which require immediate attention. But that does not mean that Bong Appetite is completely out of my mind. The Facebook page , gets it’s share of my inputs now and then. But yes, I take the blame of not being regular anymore. Hopefully this ”break term” will not be an everlasting one and I will be  back soon  with a bang and a bag full of recipes.

cr5


Winter is here, so my kitchen is buzzing with the oven alarm  quite frequently, with roasts and casserole pots retaining the heat and warmth of the kitchen. It was just another weekend in December.  With temperature going as low as zero degree ,I decided to make our selves a whole chicken roast, that would suit the  cold weather and our palate equally well. The roast dinner, required little bit of preplanning and ground work like bringing the chicken to room temperature, cleaning and preparing it for roasting. Once done I served the chicken with roasted vegetables and a gravy sauce. The outcome was  extremely mouth watering  and aromatic with smells of fresh herbs. The result was definitely worth all the effort put together.


cr4


Ingredients for the stuffing

1 onion,peeled and finely chopped

1 tbsp. fresh sage (or any other herb of your choice),finely chopped

White bread crumbs : 80gm

Sunflower oil: 1tbsp

1 egg,beaten

Salt and pepper ,to taste

cr3

Instructions

  • Heat the wok,put the oil,sweat the onions till transluscent  but soft.
  • Add bread crumbs  to the onions,mix it and season it well.
  • Take off the flame, add the egg and combine it well.
  • Roll the mixture into stuffing balls
  • Put the balls in a pre-heated oven at 180 degree Celcius for about 30 minutes,till they change colour to golden brown.
  • Take the balls out of the oven ,let them cool down little bit before stuffing.


Tips and tricks for making the perfect crispy roast  chicken

  • Take the chicken out the fridge and keep it outside ,to allow it to come down to the room temperature from chilled  temperature.This will allow the chicken to be evenly cooked and roasted.
  • Remove  the giblets, clean the chicken, rinse thoroughly and pat it dry to remove all the extra moisture.
  • This chicken roast when done in micro oven convection grill mode or  OTG or  conventional oven  will give more or less the same result. However, in each case, the oven needs to be preheated  to the required temperature.
  • However, it is important to note that the cooking time in each oven varies,hence the temperature can be well adjusted  and bit altered according to the oven you are using.
  • Do not drain the juice of the chicken left in the pan, as that is rich in flavour and can be used in  making the gravy sauce.
  • One of the main secret to have a brown  top crispy skin grilled chicken is to start cooking with a dry skin chicken and end up with a dry skin chicken as well.  For this it is important to bring the chicken to room temperature from a chilled state and pat it dry completely with paper towels. This will ensure uniform cooking. It is also necessary to allow sufficient air circulation. Thus using a shallow roasting pan and rack that hold the chicken well above the edge of the pan is important.
  • I started roasting at a bit higher temperature of 220 degrees for the first 45 minutes and then went  down to 180 degrees to   allow  slow cooking. Towards the end I increased the temperature again to allow the top skin to become crispy . I also gave additional 20 minutes for the chicken to seat in the warm enclosed oven after I turned off the oven. This allowed the chicken to retain it’s crackling top by not getting suddenly enclosed to a much cooler temperature outside.
  • The cooking time will also largely depend on the size of the chicken. Larger bird will take more time to cook. It’s  important to keep a constant eye on the chicken when its nearing doneness and not leave it completely unattended.


Ingredients for the Chicken Roast

10-12 cloves of garlic

3 table spoon olive oil

1 lemon, halved

50 gm. butter

2 sprigs of fresh rosemary or thyme

2-3 shallots

salt and pepper,to taste

1 whole chicken of 1.5oo kg ,preferably organic   (rinsed  and patted dry with giblets  removed)


cr1

Method

  • Preheat  the oven to 220C.
  • In a food processor ,pulse 6 garlic,1 tbsp. olive oil, salt ,pepper,lemon juice of half a lemon, until they form a coarse paste.
  • Smother  this mixture over chicken and under the  skin, covering the breast and thighs of the chicken.Place half of the paste under the skin,directly on meat of breast and thighs.
  • Spread the entire exterior  surface of the chicken with the remaining paste
  • Season the  chicken with salt and pepper.
  • Add one lemon half and rosemary or thyme sprigs to inside of chicken.
  • Stuff the chicken with the stuffing balls, shallots,remaining garlics and a small butter cube.
  • Rub the chicken well with the remaining butter  and olive oil.
  • Put the chicken in the oven in a roasting pan ,with the chicken loosely covered by a foil. This will allow the chicken to cook in its own moisture.
  • Roast with the foil cover for  about 45 minutes at 220 degree Celsius.
  • After 45 minutes, remove the foil cover and let the chicken roast thoroughly.
  • Occasionally take out the chicken and   brush the chicken  with its own juice with a silicon cooking brush .
  • Let it roast, by reducing the temperature  for another 45 minutes at 180C/320-350F/Gas 3-4 or until the chicken is thoroughly cooked  and piping hot ,with  no pink colour remaining.
  • When almost done, towards the end increase the temperature to 220 degrees .As that will   ensure a crispy brown top. However, keep an   eye on the chicken to avoid it burning.
  • The juices should run clear when the deepest part of the flesh, specially around the  thighs is pierced with a thin skewer.
  • When done, turn off the oven and let the chicken seat in the enclosed warm oven for another 20 minutes.
  • Check for doneness, remove the chicken  from the oven and then carve.
  • Serve the carved chicken with gravy sauce and  roasted vegetables of your choice.


cr7


Sauce/Gravy:

2 tbsp. of chicken  juices from the roasting pan

2 shallots

2 sprigs of thyme or rosemary

juice of 1 lemon

1 cup chicken stock

2tbsp butter


Method

  •  Sauté shallots in olive oil till translucent.
  • Add the chicken juice from the roasting pan.
  • Add 2 sprigs of thyme or rosemary,juice of lemon.
  • Add chicken stock cubes or reserved  chicken stock.
  • Let the sauce reduce for about 5 minutes,then  stir in the butter.
  • Combine and  mix well.
  • When well incorporated, take it off the stove and serve.
  • Enjoy!!


cr9


Chocolate Fudge Cake with Strawberry and Twix : The making of a birthday cake

CAKE

Whether it’s the 1st birthday  or a surprise 30th birthday  or a 100 year celebration, birthday cakes are as special as the birthdays themselves. Ain’t they? Birthdays for me are sheer nostalgia of home made fruit cakes specially baked by Maa with lots of love.I would wait year round for this special day to smell and taste the richness and goodness of home baked cakes.There were not many bakery shops back then in Kolkata and not many catering custom made cakes ,so Maa was the only one who I would look up-to on my birthdays for cakes.I would be her little assistant helping her making the cake batter or keeping an eye on the cake from outside the glass door of the cake oven.Helping her doing the cake was so much fun.Little did I know one day this cake apprenticeship with mom will inspire me to bake birthday cakes myself.

It was my husband’s birthday,been 4  year into the marriage I have been doing the baking ritual every year on his birthdays or shall I say growing with my baking abilities on the occasion of his birthdays?!! I have planned an impromptu surprise party; there was so much to do like inviting guests,arranging things, doing the groceries ,baking a cake -all that secretly! Quite a tough task at hand with only 5 days to his birthday.So I decided to ease out on the cake.The plan was to make a simple chocolate cake with a fudge ganache and easy but interesting decoration to go with.I  chalked out the idea and look of the cake that I would like to make, and made a quick list of ingredients to buy.Once the ingredients were at my disposal making the birthday cake was a cakewalk,literally !

And here comes the confession : I am no pro at this,just learning my way through lots of trial and error- the art of baking.But honestly I feel baking can be therapeutic.It’s like a magic to see a batter of cocoa powder,sugar,plain flour to transform slowly into a moist  fluffy chocolate cake.It’s like the caterpillar to butterfly  transformation story for me.

Recipe for Chocolate Fudge Cake with Strawberry and Twix 

Ingredients


For the Cake

225 g plain flour/self raising flour

350 g caster sugar

85 g cocoa powder

1 tsp baking powder

1/2 tsp salt

3 free range eggs

250 ml milk

125 ml vegetable oil/sunflower oil

2 tsp vanilla extract/ vanilla essence

250 ml boiling water

 For the chocolate fudge icing

400 g blocks  of milk chocolate,chopped

2/3 cup thickened cream/double cream

1/2 cup caster sugar or to taste

3-4 tbsp milk (if required)


For decoration of the cake

200 g strawberries, halved

A few packet of Twix or KitKat

A ribbon of your choice

CAKE


Preparation  of the Chocolate Cake


1.Preheat the oven to 180 C/350 F

2.Grease a cake tin of 20 cm/8 inch

3.Sift the cake flour, cocoa powder ,sugar in a large bowl ensuring that there is no lump in the batter.

4.Add the baking powder and salt to the mix.Give a dry whisk with the hand blender to mix all the dry ingredients.

5.Start adding all the wet ingredients (except boiling water) one by one: eggs,milk,oil and vanilla essence or extract.

6.Using an electric beater or a hand blender mix the batter well so that the ingredients are well combined.

7.Add the boiling water a little at a time,blending well so that the batter is smooth and liquidly.

8.Pour the mixture in the greased cake tin.

9.Bake at 180C for about 40 mins or until the top is firm to touch or skewer inserted to the centre of the cake comes out clean.

10.Remove the cake from the oven and let it cool for 10 mins.

11.Use a spatula or a blunt knife to loosen the cake from the side and base.

12.Cool the cake in the wire wrack completely at least for 2-3 hour before applying the fudge icing.

CAKE


Preparation of the fudge icing


1.Add 1″ of water in a medium saucepan or pot and bring to gentle simmer(you can speed up the process by adding 1 tsp of salt to the water)

2.Place heat proof bowl with an handle attached on top the pot when the water has reached the boiling point.Make sure that the bottom of the pot is not touching the boiling water.The steam of the water will gradually heat up the pot.

3.Add the chopped chocolate pieces to the pot and stir occassionaly until smooth and melted.Add the cream at this point mixing throughly.Finally add the sugar to the mix and let it melt.

4.Keep little milk handy,in case if the fudge icing becomes very thick,adding milk will make it smoother and easier to apply on the cake.

CAKE

Decorating the Chocolate Cake

1.You can keep the fudge icing in the fridge for half an hour or so to thicken it a bit.It should be thick enough to hold the Twix or Kit-kat sticks when placed against the cake wall.

2.Spread the fudge icing or ganache with the back of a flat spatula generously on top and all around the cake so that it forms a thick coating.

CAKE


3.Then stick the Twix or Kit-Kat sticks,one by one against the fudge coating.

4. Top the cake with halved strawberries.

5.Drizzle some of the leftover fudge icing on the strawberries if you wish to.

6.Don’t forget to tie a ribbon round the cake to make it look like the perfect gift ever 🙂

Serving suggestion

When serving individual portions warm the cake pieces with a Twix  or KitKat stick for about 30 seconds in the microwave and serve with a scoop of your favourite vanilla icecream.

CAKE